How To Solve The Puzzles In Kadish Tolesa
Many people have trouble with the puzzles in Kadish Tolesa and often resort to a walkthrough,
which can be found on other sites.
The puzzles have clues in Kadish Gallery, which is located off of Tokotah Plaza and near the Great Stairs.
Understanding these clues will make solving the puzzles much easier.
The Scopes
In the gallery, there is a clue for the scopes. It is three stained glass pictures in a stack of three.
The top glass picture is the first scope, the middle glass picture is the second scope
and the bottom glass picture is the third scope.
Here they are from left to right :
|

|
|
All you have to do is match up each scope with the glass picture.
You need to do the scopes in order as the ones you have yet to do, move before you get to them.
The first scope has a linking book to the gallery near it.
The second scope has a Bahro stone near it.
The third scope has neither near it and seems to be out in the open.
If you should get the patterns wrong, all you need to do is make them match the glass pictures for that scope, and you'll solve the puzzle.
If for whatever reason you find that you have to return to the start of Kadish Tolesa after completing the scopes puzzle,
simply redo the scopes puzzle again, as they reset when you solve the puzzle.
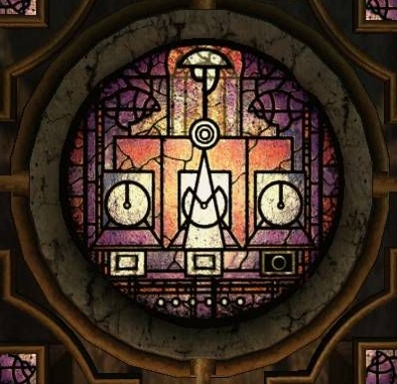
The Light Floor
Next you'll come to a round room with five blue buttons. On the floor will be lines.
Here is the clue in the gallery :
You need to do the scopes in order as the ones you have yet to do, move before you get to them.
The first scope has a linking book to the gallery near it.
The second scope has a Bahro stone near it.
The third scope has neither near it and seems to be out in the open.
If you should get the patterns wrong, all you need to do is make them match the glass pictures for that scope, and you'll solve the puzzle.
If for whatever reason you find that you have to return to the start of Kadish Tolesa after completing the scopes puzzle,
simply redo the scopes puzzle again, as they reset when you solve the puzzle.
The Light Floor
Next you'll come to a round room with five blue buttons. On the floor will be lines.
Here is the clue in the gallery :
You can see three things on this clue. The most obvious thing is a light pattern which you are supposed to recreate on the floor using the buttons.
On the left in the clue are five dots, two blue and three white. How do you know which dots are which buttons?
Look at the middle button, imagine it's at 9 o'clock. Opposite it on the other side is a red dot at 3 o'clock.
Now stand at the third button, to your left, as you came down the path, are buttons 1 and 2 and to your right, are buttons 4 and 5.
As the buttons are already blue, maybe you need to press the buttons that are white dots on the clue.
The last thing you can see on the clue is the red dot at 3 o'clock. Standing at the third button look straight ahead across the floor.
Notice the columns? Which column is where the red dot would be? What is on the floor where the red dot would be?
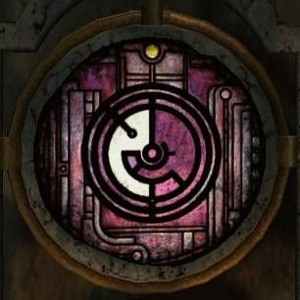
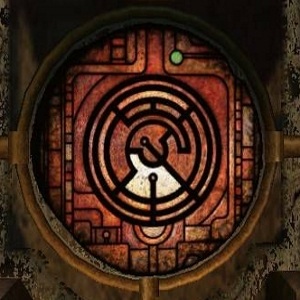
The Pyramid
The clue for the pyramid does not tell you much, in my opinion, it only gives you half the information :
The clue for the pyramid does not tell you much, in my opinion, it only gives you half the information :
What you see here are three circles next to each other, the middle one has a section of it missing, (as if someone had opened it).
Underneath each circle is a rectangle, the right hand rectangle is dark with a circle in it.
Above the middle circle is another circle with something covering the middle circle.
So the circles in order are, closed, then open, then closed.
The right hand circle for close, indicates something will be different.
What this clue does not tell you is that you need to follow the symbols for the trees.
An example of a tree can be seen at the top of the clue.
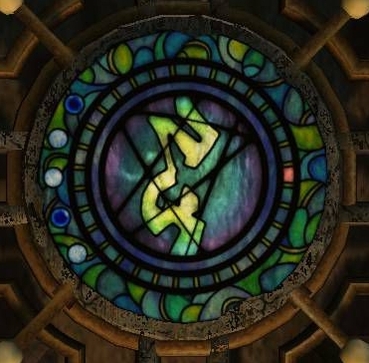
The Columns
The columns is a tricky one to solve.
If you look up, you can see a ledge. To get to that ledge you need to raise the columns.
You can raise any column a maximum of 4 times
The counterweights have 8 moves in them.
So, the ledge is 4 moves high. Look at the ladders on the columns, you need to raise the column in front to the bottom of the ladder of the column behind it.
But what about the clue in the gallery?
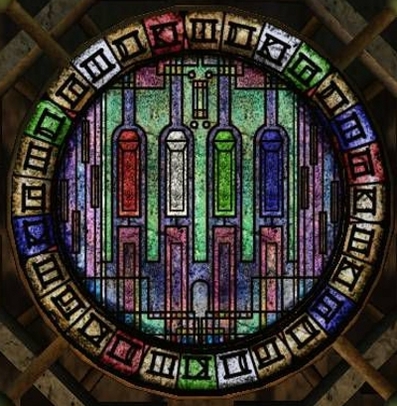
The outer ring is rotating and has four symbols on it that repeat, these are actually the numbers 1, 2, 3 and 4
You need to know your D'ni numbers, as the numbers on the outside don't run in order.
Where can you see D'ni numbers? In the gallery.
Look at the six columns with the gold rotating tops,
Those columns are numbered 1 to 6, left to right.
Some of the numbers on the clue are coloured, as are the columns in the middle.
The trick here is to look for the number that is missing from each colour, and therefore each column.
Then pull the lever for the column the same number of times as the missing number for that column.
The next puzzle is the control for the Vault which I explain in How To Work Out The Control Panel For Kadish Tolesa Vault
